
As the most popular music streaming service, Spotify requires at least 1GB of free memory on your device to ensure optimum performance. The memory storage is mainly used for 2 purposes:
To store temporary, or snippets of, music for streaming (i.e. as cache). This means that when you press play, you hear the music immediately with few interruptions.
To store downloaded music if you listen offline (Premium only).
In this case, if you use Spotify to stream music frequently, you may find that your free space will be filled up rather quickly, as there are a very big amount of memory will be taken by Spotify app, even if you might don't make tracks available offline. This will slow down Spotify app's reacting and cause the lack of memory to store more important documents. If you are in such a condition, it might be time to clear Spotify's cache. Here we are going to show you the complete steps to clear Spotify cache in Windows, Mac, iPhone and Android phone.

Spotify doesn't have an option to empty the cache folder automatically, so you need to clear the cache manually. Fortunately, deleting the cache of Spotify to free up disk space is a relatively easy and quick way. All you have to do is find the location of the cache and clear the contents in the folder.
1. Delete Spotify Cache
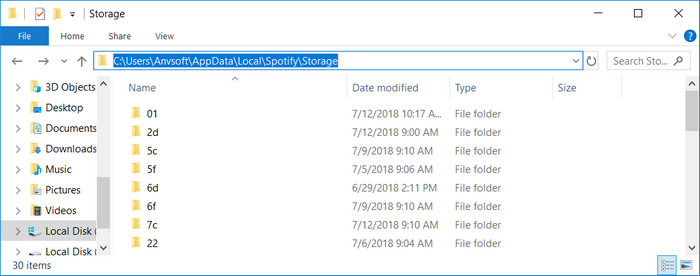
The default location of Spotify cache on Windows is: C:\Users\username\AppData\Local\Spotify\Storage. But if you have ever changed it, you can follow the following steps to locate it:
Step 1: Click ![]() in the top-right corner of the desktop app and select Settings.
in the top-right corner of the desktop app and select Settings.
Step 2: Scroll down and click SHOW ADVANCED SETTINGS to show us all the options of the application.
Step 3: Scroll down to Offline songs storage to see where your cache is stored.
Step 4: Go to that folder on your computer.
Step 5: Select and delete all the files in that folder. Please note that you need to close Spotify to clear all cached files and folders.
2. Delete Local File Cache
--How do I remove playable files from local files in Spotify when the original files are moved and deleted from its original maps? I have tried deleting everything that has with Spotify, and downloaded the installation file again. Spotify still logs me on automatically, and the former local files still comes up and are playable on Spotify!?
-- For some reason Spotify keeps adding my Music collection in Local files, it makes the program use ridiculous amounts of Processor and Ram usage.
If you encounter the same problem as described above, then you will have to delete your local-files cache.
Step 1: Close Spotify.
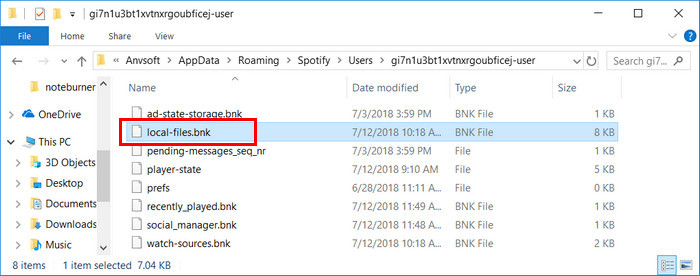
Step 2: Navigate to "C:\Users\username\AppData\Roaming\Spotify\Users\" in your file browser.
Step 3: There should be a folder in the named "{Spotify username}-user".
Step 4: Delete the file named "local-files.bnk"
1. Delete Spotify Cache
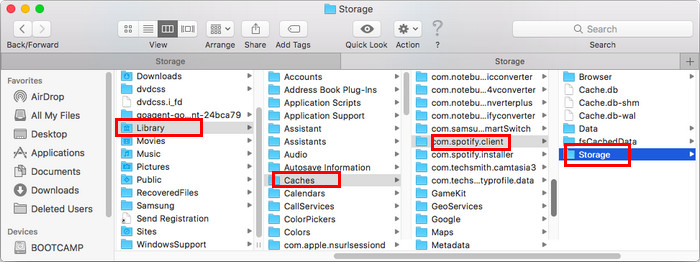
The cache file on Mac is in a slightly different location, but it is also easy to find. To delete the Spotify cache of all the streams, simply go to: /Users/username/Library/Caches/com.spotify.client/Storage/.
2. Delete Local Cache
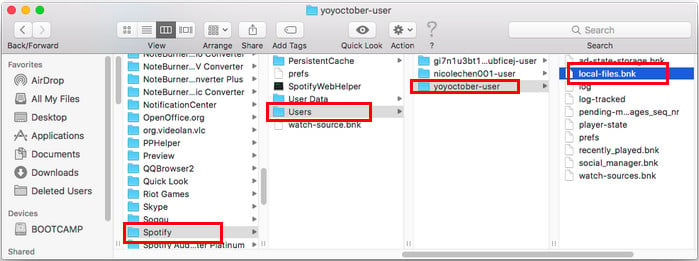
To clear up the local files cache, you should locate this path: /Users/username/Library/Application Support/Spotify/Users/{Spotify username}-user/.
Step 1: Close Spotify.
Step 2: Click "Go" in the menu bar and "Go to Folder...".
Step 3: Enter "/Users/username/Library/", and then click "Go".
Step 4: Navigate to /Application Support/Spotify/Users/{Spotify username}-user/
Step 5: Delete the file named "local-files.bnk"
Read Also: How to Download Spotify on Mac (Ultimate 2026 Guide)
When using Spotify on an Android phone, over time, Spotify cache fills all the space available to it (several GB). But luckily, there is a great option to clear cache and save data for you which make it easier to free up your memory.
Step 1: Tap Your Library ![]() in the menu at the bottom of the screen.
in the menu at the bottom of the screen.
Step 2: Tap ![]() .
.
Step 3: Scroll to Other and select Delete cache and saved data.
Step 4: Tap OK.
Note: After clearing the app's cache, you're logged out, and your login details are cleared. You'll need to resync any offline music, and reselect your preferred settings after logging back in.
It is cruel but true that there is no a Clear Cache button like Android phones to delete the cache with one click. Spotify's solution to clear Spotify caches on iPhone is to delete and reinstall Spotify app :
Step 1: On the home screen, tap and hold the Spotify icon until it shakes.
Step 2: Tap the X symbol on the icon.
Step 3: Open the App Store then search for and install the Spotify Music app.
Music streaming services keeps popping up these years, among which Spotify keeps its dominant position on the strength of its impressive 100 million plus song library with more than 60,000 new songs added each day. As a Spotify paid user, you probably have tens or hundreds of playlists on your account, and prefer to download them for playback offline. All these download will eat up your storage gradually. In this case, it is not simply enough to clear the Spotify cache. You need to free up space by manually removing downloaded tracks or moving Spotify offline songs to external hard drive. To move Spotify playlist to external hard drive without losing any data, NoteBurner Spotify Music Converter is arguably the best choice.
NoteBurner Spotify Music Converter is a smart Spotify playlist transferring tool, which is specially designed for any Spotify user to easily download and convert any Spotify track, album, artist and playlist to DRM-free MP3, AAC, WAV, AIFF, FLAC, or ALAC format, so that you can move unlimited Spotify songs to your external hard drive or other devices without any restriction. And even if you are using the Free Spotify account, this smart tool also can help you download music from Spotify at 10X fast speed while keeping the original audio quality and ID3 tags of the music in output files.
Seeking a way to transfer Amazon Music Unlimited and Prime Music songs to any devices or media players? NoteBurner Amazon Music Converter is all you need to download any Amazon songs to MP3/AAC/WAV/FLAC/AIFF/ALAC format losslessly.


Step 1 Import Tracks or Playlist
Xhoose to download songs from the "Spotify App". To import your music to NoteBurner, please directly drag and drop the playlist from Spotify to the rectangular box of the main interface or you can copy and paste the link and click the button "+".
Step 2 Choose MP3 as the Output Format
Click the  button on the bottom left to choose output format. In Convert settings, you can choose output format (MP3, AAC, FLAC, AIFF, WAV, or ALAC), conversion mode (Intelligent Mode, Spotify Record, WebPlayer Download, or YouTube Download), output quality (320kbps, 256kbps, 192kbps, 128kbps) and more.
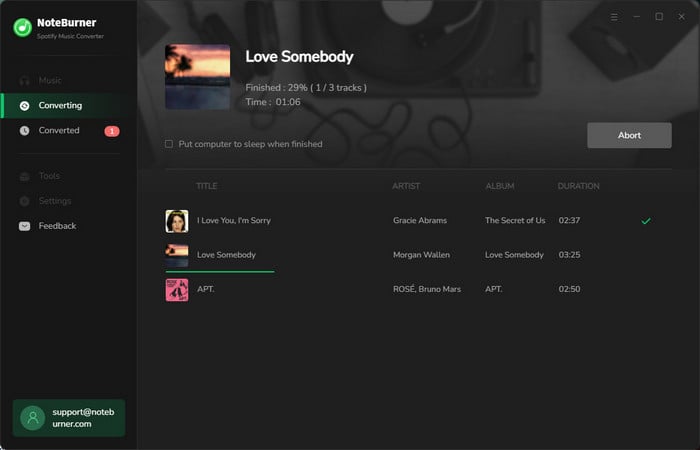
Step 3 Start Downloading
Click the "Convert" button to start downloading songs from Spotify to your Windows computer. When the conversion is done, you can find the songs by going to the output folder you customized in Step 3 or you can just click the "History" button and then click the "Folder" icon to directly go to the output folder saving the songs.
Step 4 Transfer Converted Spotify Library to External Hard Drive
Connect your external hard drive to your computer through USB cable. Open the output folder and then drag all of the converted files to it. This process time will vary, depending on how much data you want to transfer.
Note: The free trial version of NoteBurner Spotify Music Converter allows you to convert the first 1 minute of each song. You can buy the full version to unlock this limitation.


