A good media player is essential for any computer. When it comes to playing music on Windows computer, one of the most common platforms used by majority of the users is Windows Media Player. Developed by Microsoft, it is widely used for playing audio, video and viewing images on PC with Microsoft OS and mobile devices based on Windows. Apart from Windows Media Player, Apple's iTunes has also been warmly accepted in the global market since its release to the public, which allows user to enjoy movies, TV Show online, stream unlimited music and sync your favorite content between computer and iDevice. iTunes and Windows Media Player are obviously in a competitive state, to some extent. So for some users who prefer using iTunes and Windows Media Player at the same time, a common issue that arises is figuring out how to transfer media files like music between these two platforms, so that they can freely enjoy songs on Windows-driven devices or iOS-driven devices. Luckily, here we will show you the complete steps to transfer music between windows media player and iTunes.
Generally speaking, if you want to transfer some music from PC to your iOS device, such as a new iPhone or iPod, the way that immediately comes to your mind is by using iTunes. Similarly, if you own a Windows Media collection and need import music from it to your iDevice, then uploading the Windows Media collection to iTunes library would be the first step.
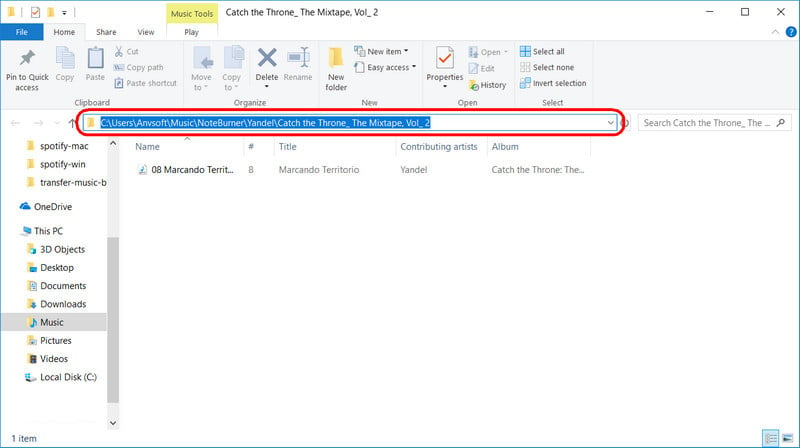
Step 1 Open the installed Windows Media Player on your personal computer. Then you will see the below interface. All file folders are arranged on the left panel. Then find the media files you wish to move to iTunes. Generally speaking, songs on Windows Media Player can be founded as follow: right-click on the songs > Open File Location.

Step 2 Once you open selected song's location, go to the address bar. Highlight the path, right-click on it and click "Copy".
Tips: Apple's iDevice doesn't support music files in WMA format, so if the imported music files contain WMA files, you need to convert those WMA files to MP3 format or other plain format.
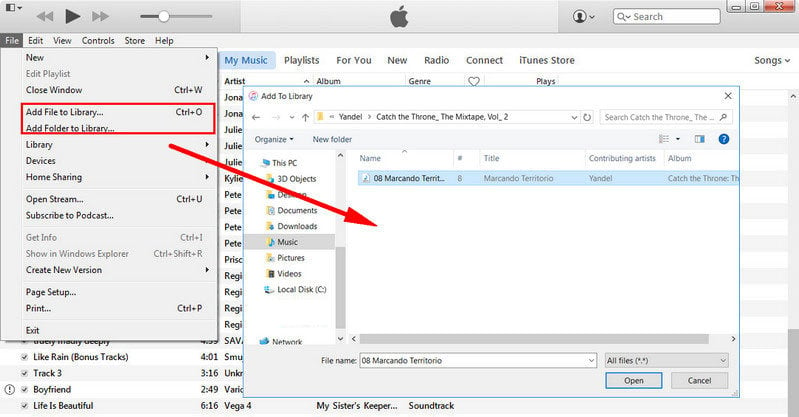
Step 3 Launch iTunes on PC, then click the "File" tab on the top left corner and select "Add File to Library" or "Add Folder to Library" from the drop-down menu.
Step 4 iTunes will ask you to locate the file or folder you want to add. Enter the file path you copied earlier and select the music files or folders you want to add to your iTunes library. Click "Open" after making your selection. The songs you've selected will now be imported to your iTunes library and you can now play them in iTunes or transfer to your iDevice.
Sometimes, you may prefer to export iTunes library to your Windows Media Player library and play them there, then please follow these steps listed below.
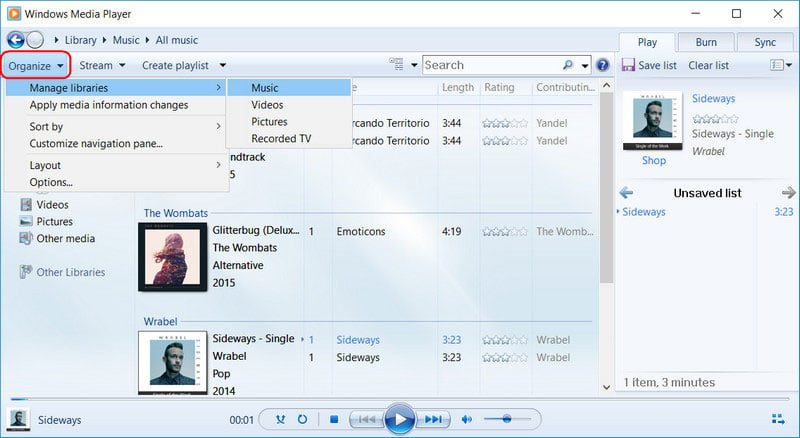
Step 1 Launch Windows Media Player. Go to the "Organize" menu. Select "Manage libraries" and click on "Music".
Step 2 The "Music Library Locations" window will appear. Click on the "Add" button and locate your iTunes library which is usually located in your computer's music library. Click "OK" when you've added your iTunes library. Your Windows Media Player library should now include songs from your iTunes library.

While both Windows Media Player and iTunes have the capability to play numerous types of audio formats, each application still own a native format that is not cross-compatible with the other program. WMA is the "native format" developed by Microsoft, also a proprietary technology that forms part of the Windows Media framework. Similarly, Apple also encodes some of its songs (especially Apple Music songs) with unique M4P format for preventing them from being opened by another media player. Thus, if you want to transfer and play iTunes M4P audio or Apple Music on Windows Media Player, it is necessary to convert these protected audio to a common format that Windows Media Player is capable of reading such as MP3.
Here you meet NoteBurner Apple Music Converter, which is a professional Apple Music Converter to help you convert Apple Music to unprotected MP3 format. Not just Apple Music songs, NoteBurner Apple Music Converter also supports to record iTunes M4P audio and audiobooks, and convert them to plain format (such as MP3, AAC, FLAC, AIFF, WAV, or ALAC format) compatible with your devices. Besides, the app is capable of converting any iTunes audio file at 10X faster speeds than its competitors.
Step 1 Download and Launch NoteBurner Apple Music Converter, then select "iTunes App" download mode.
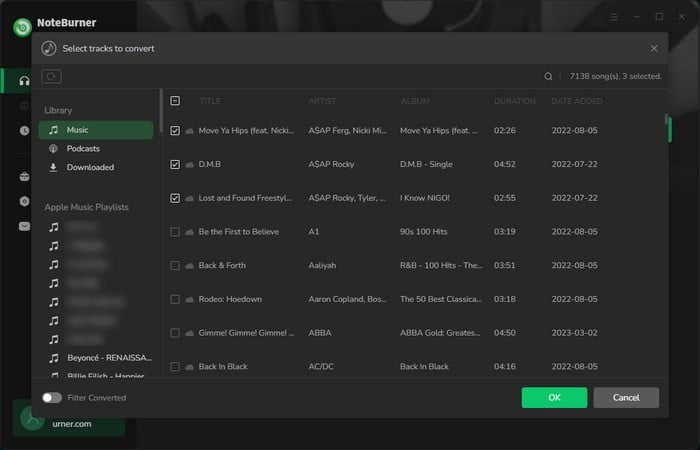
Step 2 Click the button "+Add" to add music, it will pop up a window, which will show you all of the songs you have downloaded from Apple Music. You can choose any song you want to convert.
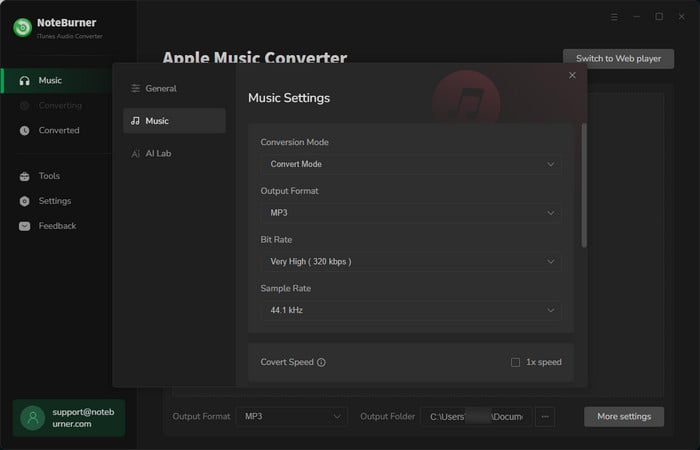
Step 3 After the successful adding, please click the button "Settings" to choose the output format as you need. In the pop-up window, you can set output path, output quality, and output format including MP3, AAC, FLAC, AIFF, WAV, and ALAC.
Step 4 After completing the above steps, the final one is clicking the button "Convert". Just a few second, it will succeed. Now the converted Apple Music is DRM-free, you can to import them to Windows Media Player.
Packaged with 761 million monthly active users and 293 million paid subscribers, Spotify is definitely the biggest music streaming service in the world. However, similar to its competitor Apple Music, Spotify also uses DRM technology and restriction to control the use of its media content by customers. Due to the DRM limitation, even if the paid users can download music for offline streaming, they can't stream offline music from Spotify to any media players as they prefer. So if you wish to play Spotify music on WMP, VLC media player, or some Android music player like Poweramp, the key point is to eliminate DRM from Spotify songs.
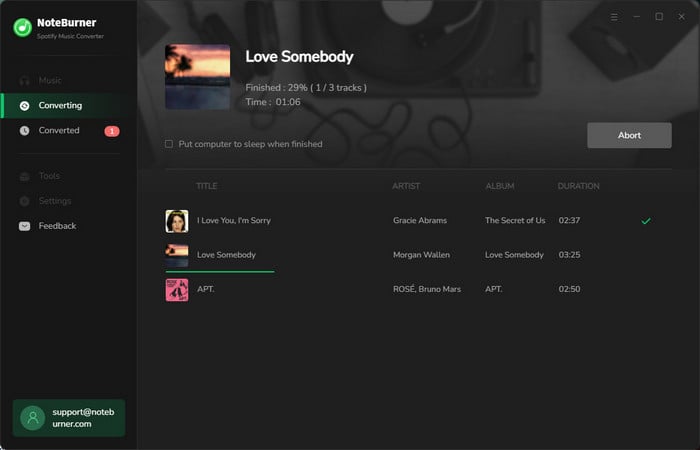
NoteBurner Spotify Music Converter is highly recommended to you to do this job. It is a brilliant Spotify Music DRM removal, which can help you easily record your Spotify music or playlist and convert them to DRM-free format like, MP3, AAC, FLAC, AIFF, WAV, or ALAC at 10X faster speed, while at the same time keeping 100% original quality of Spotify music. With the help of this smart tool, you will be able to stream all of your downloaded Spotify tracks to any media player or device for enjoyment. The steps to record Spotify music are listed below:
Step 1 Download and install this powerful program -- NoteBurner Spotify Music Converter
Step 2 Click the "Menu" button on the top-right interface, and then choose Registration in the drop-down list, you will get the register window below.
Step 3 Click the Settings button on the bottom left to choose output format. In Convert settings, you can choose output format (MP3, AAC, FLAC, AIFF, WAV, or ALAC), conversion mode (Intelligent Mode, Spotify Record, WebPlayer Download, or YouTube Download), output quality (320kbps, 256kbps, 192kbps, 128kbps).
Step 4 When finish customization, click "Convert" button to start conversion. After conversion done, you can find the converted audios by clicking History button and import them to Windows Media Player to enjoy.