
"If I cancel my Premium subscription, will I lose all of the music that I had added to my playlist or downloaded to my phone? Will I still be able to listen to all of them once my subscription is expired? "
No. As a paid user, you can, of course, download Spotify music for offline listening. Meanwhile, you will still be on Premium for the remainder of the month you've paid for after canceled subscription. But after that, your Spotify account will revert back to the Free one. In this case, although you retain all offline Spotify music files, you don't have access to streaming them. In other words, you can still keep all of your playlists and listen to, but only in shuffle mode and with ads and skip limitations.

As we all know, Spotify is proprietary and restricts you from listening to downloaded Spotify Music offline after canceling Premium subscription. To keep all of your downloaded tracks or playlists playable after unsubscribing, you need to record Spotify music or Playlist in open music format first.
NoteBurner Spotify Music Converter is a professional Spotify Music Downloader, which can easily record your Spotify music or playlist and convert them to an open format like, MP3, FLAC, AAC, AIFF, WAV, or ALAC at with keeping 100% original quality of Spotify music. Thus you will still be able to enjoy all of your downloaded Spotify tracks offline after canceling Premium account, and save them on your phone forever.
The following is a detailed tutorial about how to record Spotify music on Mac. Please download this useful tool on your computer first before getting started. For Windows users, please go to How to Convert Spotify Music on PC for more step-by-step details.
Seeking a way to transfer Amazon Music Unlimited and Prime Music songs to any devices or media players? NoteBurner Amazon Music Converter is all you need to download any Amazon songs to MP3/AAC/WAV/FLAC/AIFF/ALAC format losslessly.

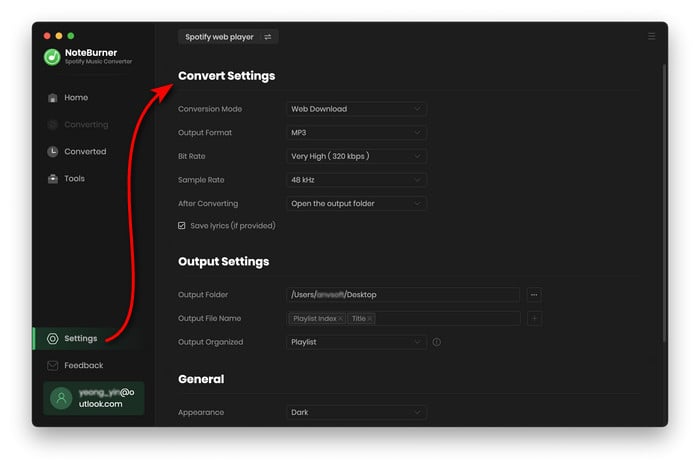
Click the Settings button interface to set output format, output quality and output path. You can convert Spotify music to MP3, AAC, FLAC, AIFF, WAV, or ALAC with high quality (320 kbps is available to choose).
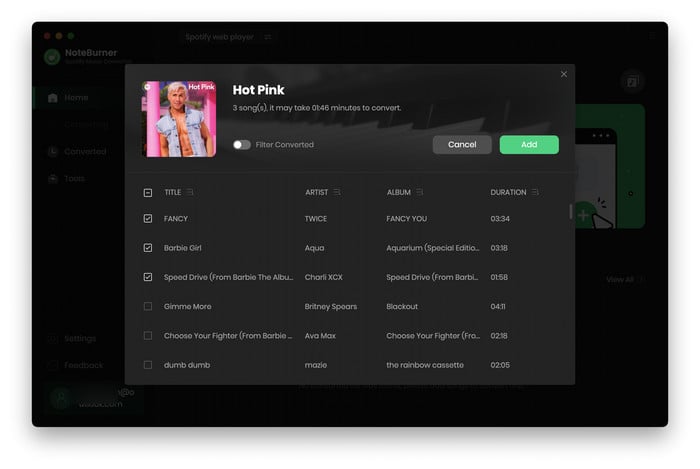
Drag or drop the audios you would like to convert from Spotify to NoteBurner Spotify Music Converter, or copy and paste the Spotify song/playlist link to the link parsing bar. Tick the songs and click "Add".
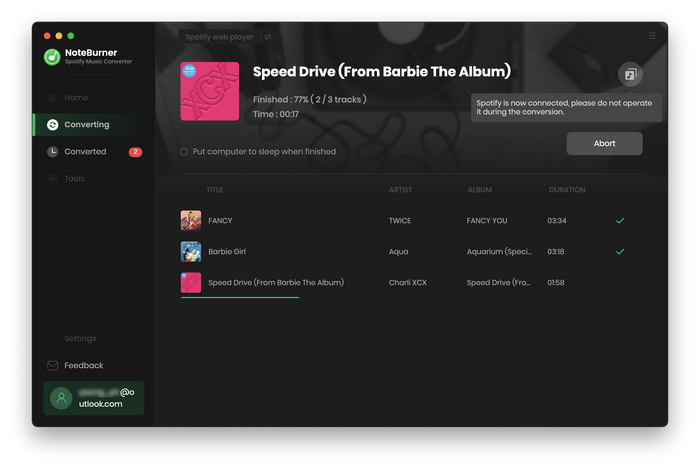
After the above setting, click the "Convert" button to start converting Spotify music. After converting, the output folder will be open automatically. Or you can also click the Converted button on the left side of the interface to find the converted Spotify music. The converted Spotify audio is in MP3/AAC/FLAC/WAV/AIFF/ALAC format, you can play them offline even after unsubscribing.
Note: The free trial version of NoteBurner Spotify Music Converter enables you to convert the first 1 minute of each song. You can buy the full version to convert the full music.

One-stop music converter for Spotify, Apple Music, Amazon Music, Tidal, YouTube Music, etc.
Convert Apple Music, iTunes M4P Music, or Audiobook to MP3, AAC, WAV, AIFF, FLAC, and ALAC.
Convert Amazon Music to MP3, AAC, WAV, AIFF, FLAC, and ALAC with up to Ultra HD quality kept.
Convert Tidal Music songs at 10X faster speed with up to HiFi & Master Quality Kept.
Convert YouTube Music to MP3, AAC, WAV, AIFF, FLAC, and ALAC at up to 10X speed.

Convert Deezer HiFi Music to MP3, AAC, WAV, AIFF, FLAC, and ALAC at 10X faster speed.


